Salmon with basil & lentils

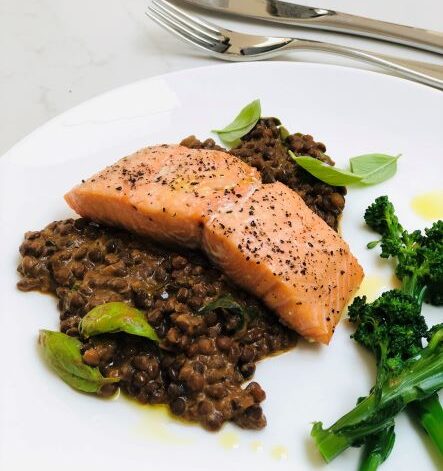
Salmon with lentil and basil

This incredibly easy recipe uses only a few ingredients, but tastes great. You can vary the grains depending on what you have in the cupboard, or what you like to eat, but the pack of lentils I use here has lots of great flavour which really adds to the dish, so I would strongly recommend it.

I’ve written this recipe as part of a new lifestyle and wellness programme especially designed for managing the menopause by pilates expert Jo Tuffrey

I’m not a nutritionist, but I do know that the most important thing to remember when eating during menopause, is to ensure you have a balanced plate of food. That means it needs to include wholegrain carbs for slow release energy, a good source of protein (salmon is good because it’s high in vitamin D), healthy unsaturated fats (so that’s things like olive oil, nuts, seeds etc), and preferably some calcium too. Osteoporosis can be an issue during menopause, so it’s important to look after your bones. Calcium and vitamin D are both critical for this.

I hope that this recipe ticks all of those nutrition boxes, but also tastes delicious and feels comforting, warming and wholesome to eat.

Serves: 2
Prepare: 5 minutes
Cook: 10-12 minutes

2 x 250g lightly smoked salmon fillets (or unsmoked, if you prefer)
Extra virgin olive oil, to drizzle
200g Tenderstem broccoli (or other favourite green veg)
About 10-15g basil
250g pack Merchant Gourmet Tomatoey French Puy & Green Lentils
2 tbsp half fat crème fraiche

  1. Preheat the oven to 220C, gas mark 7. Line a baking sheet with foil. Put the salmon on top, skin-side down. Drizzle with olive oil and season well. Bake for 10-12 minutes or until just cooked through.
  2. Meanwhile, bring a medium pan of water to the boil. Cook the broccoli for 4 minutes, then drain and keep warm.
  3. Return the pan to a low heat. Trim then finely chop the basil stalks. Place them into the pan with the lentils and 2-3 tbsp water. Cook over a low heat for 2-3 minutes, until piping hot.
  4. When the salmon is cooked, stir the crème fraiche and whole basil leaves through the lentils. Spoon onto warm plates. Serve the salmon, leaving the skin behind on the foil (unless you like to eat it), on top of the lentils, with the broccoli, seasoned and drizzled with olive oil, on the side.
Continue Reading

Spiced oat cookies

Spiced oat cookies

Quick and easy cookies, packed with nutrient-rich oats and wholemeal flour. They’re really easy to make too, so they’re perfect as a quick and satisfying bake, or for making with children over the summer holiday’s.

Prepare: 15 minutes
Cook: 10-12 minutes
Makes: 12

75g wholemeal flour
1 tsp baking powder
75g porridge oats
50g caster sugar
1/2-1 tsp mixed spice
75g butter
1 tbsp golden syrup
2 tbsp milk

  1. Preheat the oven to 180C, gas mark 4. Line a baking tray with baking parchment.
  2. Mix the flour, baking powder, oats, sugar and mixed spice together in a large bowl.
  3. Melt the butter, syrup and milk together in a small saucepan over a low heat or in the microwave, until just melted. Pour it over the oat mixture and stir everything together until evenly coated.
  4. Spoon the mixture into 12 rounds on the prepared tray – I like to use a round cookie cutter as a guide so they all end up about the same size – and leaving space between each biscuit as they will spread during cooking.
  5. Bake for 10-12 minutes, or until golden. As soon as the tray comes out of the oven, use a large heatproof cutter to ‘scoot’ the hot biscuits – place the cutter over each cookie and swirl it inside the cutter to round the edges. See below. That way they all end up the same size and shape! Leave to cool on the tray.
How to ‘scoot’ cookies

Continue Reading

Marmite & Cheddar Spirals

Marmite and Cheddar spirals

Love Marmite, or loathe it, these easy spirals are perfect for lunch boxes or picnics. If you really can’t stand Marmite, just leave it out and use only your favourite cheese; or try spreading with pesto or ‘nduja instead. And if you’re in a hurry, then a batch of savoury scone dough can be used in place of the bread (no proving required), or for ease you could use a 500g pack of bread mix, to save all the weighing and measuring.

Prepare: 25 minutes
Cook: 20 minutes
Makes: 12

500g strong white bread flour, plus extra for dusting
7g sachet fast action yeast
½ tsp salt
½ tsp sugar
2 tbsp Marmite, or to taste (the squeezy one is easier to use for this recipe, if you have it)
100g Cheddar cheese, grated

  1. Place the flour into a large bowl. Put the yeast to one side of the bowl and the salt and sugar on the other side. Gradually mix in 250-300ml water until very soft.
  2. Keep kneading either by hand or with a stand mixer until the bowl is clean and the dough is smooth and elastic. Cover and set aside in a warm place for 45 minutes or until doubled in size.
  3. Preheat the oven to 200C, gas mark 6 and line a large baking tray with parchment paper.
    Turn onto a floured surface and using a rolling pin, roll into a large rectangle – about 35-40×25-30cm. Spread or squeeze over the marmite, as evenly as possible, then scatter over the cheese. Starting at the long edge in front of you, roll up, like a swiss roll. Then using a sharp knife, cut into 12 even pieces.
  4. Place cut-sides up on the prepared tray and place into the oven for 20 minutes, or until bubbling, risen and golden. Leave to cool slightly and serve warm or cold. They are best on the day they are baked, but will keep in an airtight container for a day or two.

Continue Reading

Tasty turkey meatballs in tomato sauce

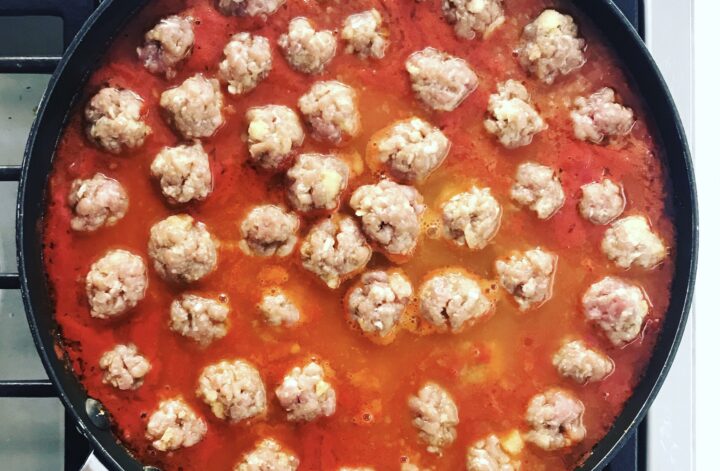
These meatballs are really quick and easy to make, so they’re perfect for a meal during the week. They also contain lots of hidden veg, so they are great for increasing your daily quota, or to help when it comes to feeding fussy children.

You can also freeze them, and the sauce (either together or separately) so they’re always ready to use. Just defrost in the fridge overnight, and be sure to heat them thoroughly before eating.

Prepare: 20 minutes
Cook: 45-55 minutes
Serves: 6

1 onion, peeled
1 stick celery
1 carrot, peeled
1 clove garlic
2 tbsp olive oil
1 tsp dried thyme (optional)
2 x 400g cans chopped tomatoes
1 tsp sugar
500g turkey thigh mince
2 tbsp breadcrumbs
2 tbsp freshly grated Parmesan (or extra mature Cheddar)
1 tsp Worcestershire sauce

  1. Put the onion, celery, carrot and garlic into a food processor and blitz until very finely chopped (or you can do this by hand). Reserve 2 tablespoons of the mixture for the meatballs.
  2. Warm the oil in a large, heavy-based frying pan or shallow casserole, add the vegetable mixture, along with the thyme (if using), and cook over a low heat, stirring occasionally, for about 10 minutes.
  3. Add the tomatoes, filling up each empty can with water and adding that to the pan too. Season with the sugar, 1 tsp sea salt flakes and some pepper. Stir well and let the mixture come to the boil, then turn the heat down and simmer gently while you make the meatballs.
  4. Put the reserved chopped vegetables into a large bowl with the mince, breadcrumbs, cheese and Worcestershire sauce. Season with 1/2 tsp sea salt flakes and mix together with your hands.
  5. Dampen your hands with a little cold water and roll teaspoon sized pieces of mince into balls. Put each one onto a large, lined baking tray or board as you go, to make about 50 little meatballs (or fewer bigger ones! It’s up to you!).
  6. Drop the meatballs gently into the simmering sauce – working from the outside of the pan, inwards, in concentric circles. Simmer gently for 20-30 minutes, turning the balls over halfway through, until thoroughly cooked and there is no pink meat. Serve with pasta, rice, couscous or even a jacket potato or wrap.
Tasty turkey meatballs in tomato sauce….

Continue Reading

Chocolate orange pudding

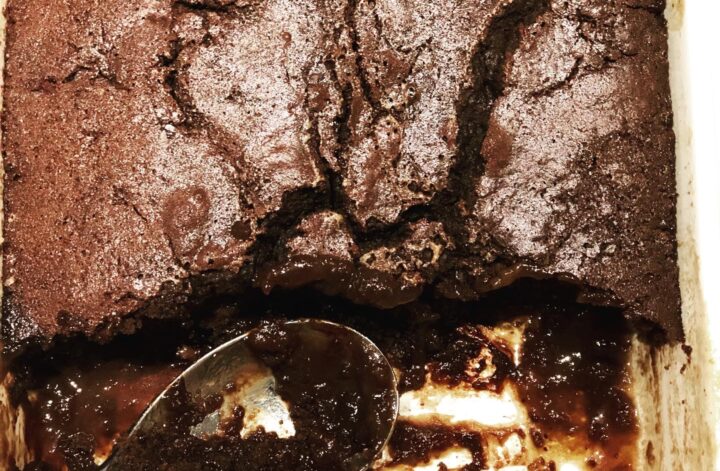
This deliciously rich pudding makes it’s own gooey sauce as it cooks. It’s one of those strange self-saucing bakes where you pour the sauce over the top of the cake batter, before baking. Then the layers swap over in the oven. We call it an ‘impossible pudding’ in our house.

Prepare: 15 minutes
Cook: 30 minutes
Serves: 8

100g butter , melted, plus extra for greasing
250g self-raising flour
140g caster sugar
75g cocoa
1 tsp baking powder
1 large orange, finely grated zest and juice
3 medium eggs
150ml milk
100g orange dark or milk chocolate, broken into pieces (I used Lindt orange milk chocolate)
200g light soft brown sugar

  1. Preheat the oven to 180C, gas mark 4 and grease a 2 litre ovenproof baking dish with a little butter. Put the flour, caster sugar, 50g of the cocoa, baking powder, orange zest and a pinch of sea salt flakes in a large mixing bowl.
  2. Whisk the orange juice, eggs, melted butter and milk together, then gradually pour this onto the dry ingredients, whisking throughout, until smooth. Stir in the chocolate pieces. Spoon the mixture into the baking dish.
  3. Mix 300ml freshly-boiled water with the soft brown sugar and remaining 25g cocoa. Pour this all over the pudding batter – don’t worry, it will look really odd and unappetising at this stage!
  4. Bake for 30 minutes, until the surface looks firm and risen. Spoon into serving bowls, together with the rich, glossy sauce beneath. Eat immediately with cream, custard or vanilla ice cream.

    Top tip: If you don’t like chocolate and orange together, just leave out the fruit (adding a little extra milk to loosen the sponge) and use plain dark or milk chocolate instead.

    You can even do this in a slow cooker: Remove and grease the slow cooker pot. Follow steps 1 and 2 above, then spoon the mixture into the slow cooker pot. Mix 275-285ml (1/2 pint) freshly-boiled water with the soft brown sugar and remaining 25g cocoa then pour this over the batter. Return the pot to the slow cooker base, cover and cook on high for 3 hours, until firm and risen.

Continue Reading

Crispy-topped fish pie

Easy fish pie with crunchy topping

This recipe couldn’t be easier. It’s super tasty and nourishing – perfect for family meals or a bit of easy entertaining. You can make it ahead if you like too – just to make things even easier. Keep reading to find out how…

Prepare: 10 minutes
Cook: 20 minutes
Serves: 6

500ml whole milk
2 fresh bay leaves
1 small onion, finely chopped
3-4 anchovies in olive oil, drained and chopped
4 tbsp cornflour
4 tbsp dry white wine
750g mixed fish fillet (haddock, cod, salmon), skinned, in large chunks
150-250g raw, peeled king prawns
2 tbsp flat-leaf parsley, chopped
75g fresh breadcrumbs
25g Parmesan, finely grated

  1. Preheat the grill to medium. Pour the milk into a large, shallow, ovenproof and flameproof casserole dish (or use a saucepan and transfer to an ovenproof dish later). Add the bay leaves, onion and anchovies and bring to a gentle simmer for 5 minutes or until the onion is tender.
  2. Mix the cornflour with 4 tbsp cold water to make a paste. Stir into the milk and simmer for 2-3 minutes, until thickened slightly.
  3. Stir in the white wine and then the fish. Season and cook for 2-3 minutes. Stir in the prawns and cook for a further 3-5 minutes or until the prawns are pink. Remove the bay leaves, then add the parsley.
  4. If needed, transfer the mixture into a 2 litre ovenproof dish. Mix the breadcrumbs and cheese together, then scatter over the top of the fish. Grill for 5 minutes or until golden and bubbling. Serve immediately. Great with steamed green beans.

Top tips: if you’re a fan of peas, add a few handfuls of frozen or fresh peas to the mixture at the same time as the fish. And if you want to make this ahead, just make the fish layer, then cool, cover and chill for up to 24 hours, then when ready to eat, reheat gently and add the crumbs at the last minute and continue as above.

Perfect wine match: Pialli Tai Rosso from VinAnima find some more info here: https://www.vinanima.com/veneto/pialli/

Click here for quick video of how to make it….

Continue Reading

Chocolate orange cookies

Chocolate orange cookies

These super easy cookies are made with just 5 ingredients. They are like a chocolate shortbread really – buttery, crumbly and delicious. Add some choc chunks too if you like, or drizzle melted chocolate over them too once cooled. Keep reading for my top tip on how to get them all a beautifully even, round shape too….

175g butter , softened
85g golden caster sugar
200g plain flour
2 tbsp cocoa powder
1 orange, finely grated zest

  1. Mix the butter and sugar together with a wooden spoon. Stir in the flour and cocoa, followed by the orange zest.
  2. Roll the dough into a log about 6-7cm thick – or adjust, depending on how big or small your want your cookies. Wrap and chill for at least 1 hour, until firm, or for up to 5 days. The dough can also be frozen at this stage, for up to 1 month.
  3. Preheat the oven to 180C, gas mark 4. Using a sharp knife, cut the unwrapped log into 1cm-thick rounds. Transfer to a baking tray lined with baking parchment and bake for 10-12 minutes.
  4. Remove from the oven and immediately, while they are still hot, use a round cutter, just bigger than the cookies, to shape each one like this….see the video below…this is called cookie scooting. Leave them to cool on the tray.
How to scoot cookies and biscuits so they are round and even every time
Continue Reading

Oat, peanut & chocolate BOOM bars

These are totally delicious! I wish i knew who’s recipe it was (I wish it was mine!) because it’s really excellent. If it’s yours please do let me know as I would love to credit you! Although I have made a couple of tweaks – I hope you don’t mind. The recipe came home from school as part of mental healthy awareness week. Isn’t that wonderful – teaching children that cooking and eating well can and will improve your mental health. They’re also really easy to make.

Prepare: 20 minutes, plus freezing
Makes: 16 (or more or less if you like)

200g pitted dates
100g porridge oats
3 tbsp smooth peanut butter (or other nut or seed butter)
1/4 tsp sea salt
A handful of salted peanuts
180g pack milk or dark chocolate, melted

  1. Put the dates in a bowl and cover with boiling water. Leave to stand for 15 minutes. Meanwhile, put the oats into a food processor and wizz until fine, to make ‘oat flour’.
  2. Drain the dates and put them into the food processor (there’s no need to wash it in between). Add the peanut butter, salt and 1 tbsp hot water. Blend until smooth to make date caramel, scraping down the sides occasionally if needed. Remove to a bowl.
  3. Put the oat flour into the food processor (again there’s no need to wash it). Add 3 tablespoons of the date mixture and blend, gradually adding 1-3 tablespoons of hot water to make a sticky dough. Press this firmly into the base of a baking parchment lined 900g loaf tin, until flat and pushed into all the corners.
  4. Spread the remaining date caramel over the top, then scatter with the peanuts and push them into the top. Place into the freezer for at least 2 hours or until very firm.
  5. Remove from the tin, then using a sharp knife, cut into 16 bars (or make more or less if you like). Dip into melted chocolate using two forks, let any excess drop off, then sit on a wire rack to set. Chill in the fridge until firm – if they last that long.


Oat, peanut & chocolate boom bars
Here’s how to make them…
Continue Reading

Pistachio, Rhubarb & Polenta cake

Pistachio, Rhubarb & polenta cake – amazing with cream and custard

This super-easy cake is flour-free and really versatile. You can use ground almonds, or other nuts if you like, or vary the fruit too using either fresh or dried – whatever you have available.

Prepare: 15 minutes, plus cooling
Cook: 1 hour
Serves: 12


400g forced rhubarb
200g caster sugar, plus 1 tbsp
1 tbsp sweet dessert wine (optional)
3 medium eggs
125ml olive oil, plus extra for greasing
175g ground pistachios (I just blitz mine in a food processor until fine)
125g polenta
1 tsp baking powder

  1. Preheat the oven to 170˚C, gas mark 3. Lightly brush the base and sides of a 23cm springform cake tin with a little olive oil and line the base with baking parchment.
  2. Cut the rhubarb into 6cm lengths. Toss with 1 tbsp sugar and the wine (if using). Set aside while you make the cake batter.
  3. Whisk the eggs and 200g sugar with an electric whisk for at least 5 minutes, or until thick, pale and voluminous. Very slowly trickle in the oil (as if you’re making mayonnaise), whisking as you go, until incorporated.
  4. Meanwhile, place the pistachios in a large bowl and stir in the polenta, baking powder and a good pinch of sea salt flakes. Fold this into the egg mixture with a metal spoon.
  5. Pour into the prepared tin and top with the rhubarb. Bake for 1 hour, or until a skewer inserted into the centre comes out clean. Leave to cool completely in the tin. Run a knife around the edge and carefully remove from the tin. Serve with lightly whipped cream, creme fraiche or custard.
Continue Reading

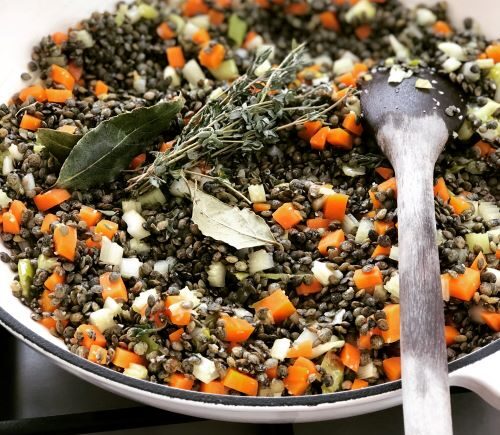
Autumn braised lentils

Autumn braised lentils

This easy recipe is perfect for warming you up on a cold Autumnal day. They’re great with sausages and meats, or scattered over a salad or into soup to make it more substantial. I’ve even been known to add them to a bolognaise to increase the veg quota without the children being any the wiser. They also freeze really well – the lentils, not the children.

425g lentils (brown, green or Puy)
1 tbsp olive oil
2 cloves garlic or 1 tsp garlic granules
1 onion, diced
2 sticks celery, diced
2 carrots, peeled and diced
A few thyme sprigs (I keep mine in the freezer then add them straight from frozen)
3 bay leaves (as above – keep them in the freezer)
800ml vegetable stock, hot
6 cavolo nero leaves, stalks removed, finely shredded

  1. Rinse the lentils under cold running water in a sieve then drain well.
  2. Warm the oil in a wide ovenproof cast iron pan then add the garlic or garlic granules, and the onion, celery and carrot. Cover and cook gently for 10-15 minutes, until softened.
  3. Add the lentils and mix well to coat in the oil. Add the herbs, followed by the stock. Cover and simmer for 40-50 minutes or until the lentils are as tender as you like them, and have absorbed almost all the liquid. Alternatively, you can do this in a preheated oven at 170C, gas mark 3.
  4. Mix the cavolo nero into the lentils and leave to wilt. Season and serve, or set aside to cool.

Tip: these lentils will keep in the fridge for up to 3 days and can be eaten cold or hot – just make sure you reheat them really thoroughly before eating. The same applies if you are freezing them – add a little extra stock or water too during reheating if they look a little dry.

Continue Reading